The Hidden Hygiene Crisis in Your Kitchen: Why Keurig Machines Become Mold Magnets
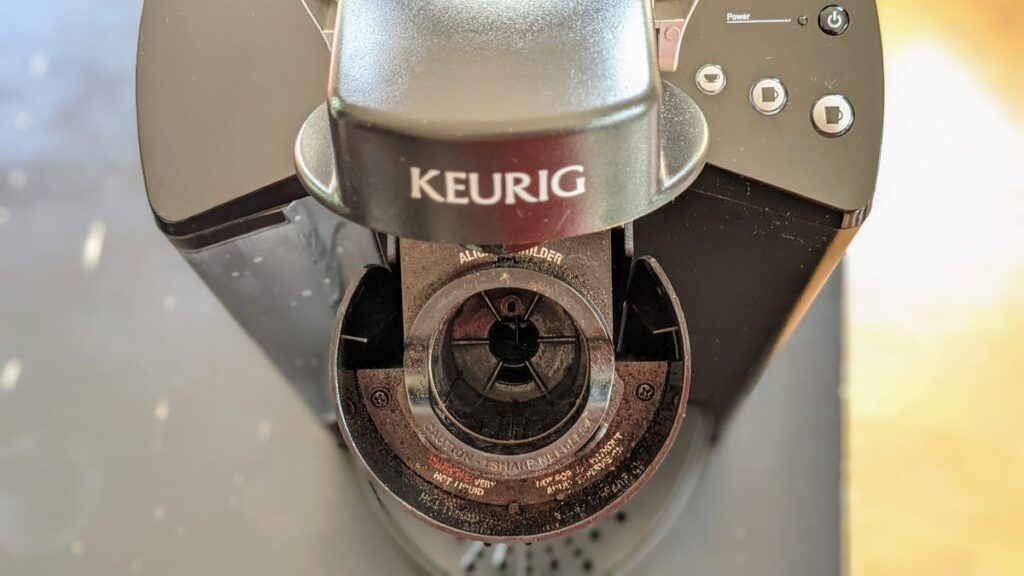
Table of Contents
The Invisible Biofilm Problem
The Keurig ecosystem is designed for a singular purpose: frictionless caffeine delivery. But the very engineering that allows for a 30-second brew—compact internal tubing, heated reservoirs, and piercing needles—creates a perfect storm for microbial growth. For many users, the first sign of a problem isn’t a mechanical failure, but a subtle change in taste or a faint, musty odor emanating from the machine.
The reality is that the interior of a pod-based brewer is a warm, humid environment. When organic coffee residue combines with standing water, it forms a biofilm—a thin, slimy layer of bacteria and fungi that clings to the internal walls of the machine. While the exterior may look pristine, community reports on platforms like Reddit have highlighted alarming instances of black mold colonies thriving inside neglected reservoirs and pod holders, often unnoticed until the machine is disassembled for repair.
Addressing the Primary Contamination Points
To maintain a hygienic brew, the focus must shift from the surface to the high-contact areas where residue accumulates. The K-Cup holder is the most critical point of failure. Because this area is exposed to both the heat of the brewing process and the organic waste of the coffee grounds, it frequently becomes a breeding ground for mold.
If a used pod is left in the machine for several days, the moisture trapped between the pod and the holder accelerates fungal growth. This mold can then migrate into the needle assembly, potentially contaminating subsequent brews. To mitigate this, the pod holder should be removed—following the specific model’s manual—and scrubbed with hot, soapy water. Particular attention should be paid to the puncture needle, which can accumulate calcified coffee oils that obstruct water flow and harbor bacteria.
The Reservoir and Drip Tray Cycle
While the water reservoir seems straightforward, it is a frequent site for algae and bacterial films, especially in machines that sit in direct sunlight. It is essential to remove the water filter before cleaning the tank with dish soap to avoid damaging the filtration media. Similarly, the drip tray is often overlooked; however, the standing water and spilled coffee residue create a stagnant environment where mold can proliferate, eventually affecting the overall smell of the brewing area.
The Technical Necessity of Descaling
Beyond biological contamination, Keurigs face a chemical challenge: mineral scale. Depending on the hardness of your local water supply, calcium and magnesium deposits build up inside the heating element and tubing. This ‘scale’ doesn’t just affect the taste of the coffee; it forces the pump to work harder, increasing the risk of mechanical failure and reducing the temperature of the brew.
Descaling is the process of removing these mineral deposits. While Keurig sells proprietary descaling solutions, a mixture of white distilled vinegar and water is a common and effective alternative. The process typically involves filling the reservoir with the solution, running a full brew cycle without a pod, and allowing the mixture to sit inside the machine for several minutes to break down the calcification. Following this with multiple cycles of fresh water is necessary to strip the vinegar aftertaste from the system.
Establishing a Maintenance Cadence
Preventing a total system failure or a health hazard requires a tiered approach to maintenance. Surface wiping and drip tray emptying should be a daily or weekly habit. A deeper clean of the K-Cup holder and reservoir should occur every few weeks. Full descaling, depending on water hardness, is generally recommended every three months to ensure the heating element remains efficient and the water path remains clear of obstructions.